新闻中心

如何用jquery建立类Twitter站点
Twitter是世界上最流行的互联网服务,它为用户提供微博客服务,界面简洁美观。本文中,我们将使用jqueyr建立一个类twitter站点。你将学习jquery一些的技巧,以及如何一起使用PHP和mysql。你会喜欢的。
作者:jigoufei
Guofei Ji是中国青岛的一位软件工程师,供职于阿尔卡特-朗讯。他的兴趣是jquery, PHP及其它web设计技术。
获取源代码:http://media.sitejerk.com/wp-content/uploads/2009/10/533_CODE.zip
介绍
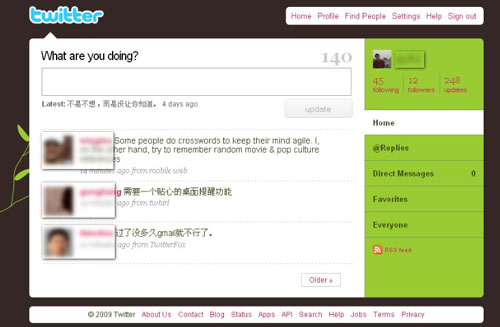
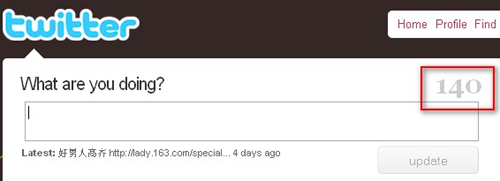
通过twitter,用户可以任何时候发布他们在做什么,twitter会及时显示这些信息。从而,每个朋友都能同时知道你在做什么。twitter主页如下:
在本教程中,我们将实现类似twitter的界面,并且会使用PHP实现信息发布功能,数据会保存到mysql数据库中。
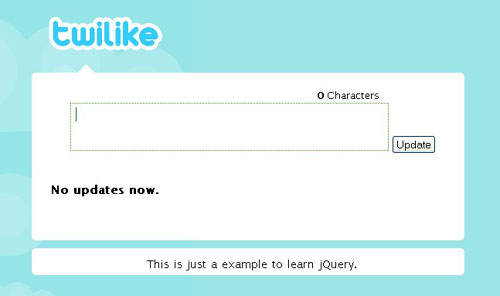
第一步:界面布局
界面布局和twitter.com非常相似。本例中,只会显示消息文本框和消息显示区域,如上图所示。html代码如下:
| 以下为引用的内容: <!DOCTYPE html PUBLIC "-//W3C//DTD XHTML 1.0 Transitional//EN" "http://www.w3.org/TR/xhtml1/DTD/xhtml1-transitional.dtd"> <div id="messagewindow"> |
将代码保存为index.php,我们将向文件中添加一些PHP代码以便显示消息。
接着,我们可以用CSS定义页面的样式。CSS文件命名为style.css:
| 以下为引用的内容: body { #title{ #title img { #title h2{ #footer { #arrow { #container, #footer { #footer { #container { #container form { legend { #footer_a { fieldset { |
当然,请不要忘了引用外部CSS文件。
<link media="screen" href="css/style.css" type="text/css" rel="stylesheet" />
第二步:用mysql创建数据库
mysql是一个非常强大的数据库系统,最重要的是,可以免费使用在我们的例子中,我们将使用mysql保存我们的消息数据。创建一个新表“message”,其字段如下所列:
id: key of this table, integer, auto-increment
message: the text of message, string
date: the message date, data format
该表设计如下:
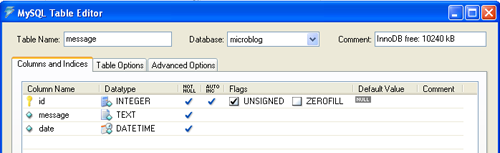
创建该表的sql脚本如下:
CREATE TABLE `microblog`.`message` (
`id` int(10) unsigned NOT NULL auto_increment,
`message` text NOT NULL,
`date` datetime NOT NULL,
PRIMARY KEY (`id`)
);
第三步:用php配置mysql连接
在本教程中,我们建立一个配置文件用于保存数据库配置信息,例如主机名、用户名、密码、数据库名称,等等。文件config.php如下:
| 以下为引用的内容: <?php // Configuration $dbhost = 'localhost'; $dbuser = 'root'; $dbpass = ''; $dbname = 'microblog'; $conn = mysql_connect ($dbhost, $dbuser, $dbpass) or die ('I cannot connect to the database because: ' . mysql_error()); |
在代码中,mysql_connect()函数用于丽娜接mysql数据库服务器。该函数有三个参数:主机名、用户名和密码。连接数据库后,我们可以用函数mysql_select_db()查询活动的数据库,mysql_select_db()需要一个参数,数据库名称。
第四步:实现信息发布功能
发布和显示消息是本教程的核心功能。我们将使用jquery库来实现它。首先我们应在html页面中包含jquery库。
<script type=“text/javascript” src=“js/jquery.js”></script>
所有jquery代码将被保存在main.js中,也应被包含在html页面:
<script type=“text/javascript” src=“js/main.js”></script>
在main.js中,我们应在编写jquery代码之前定义函数$(document).ready()。
$(document).ready(function(){
//Place your codes here
});
实现发布新消息的ajax代码如下:
$(document).ready(function(){
$.post("backend.php",{
message: $("#message").val(),
action: "postmsg"
}, function(xml) {
$("#comm").html("The latest Update: ");
addMessages(xml);
});
return false;
});
});
在代码中,$post()函数用于通过ajax发布信息到后台逻辑backend.php。返回数据是xml格式。addMessages()函数用于不刷新页面显示新更新的消息。
function addMessages(xml) {
message = $("message",xml).get(0);
$("#comments").prepend("<li><p class='info'>Added on Today:</p> <div class='body'>"
+ $("text",message).text() + "</div></li>");
$("#message").val("").focus();
}
返回数据是xml格式,从firebug中,我们能看到:
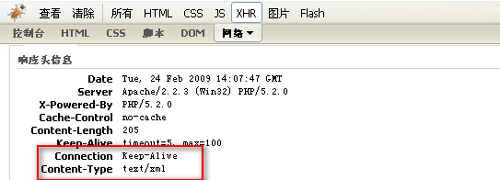
下面是该xml文件的一个例子:
那么,在上面的jquery代码中,$(”text”,message).text()用于得到消息。请注意如何使用javascript/jquery得到xml文件节点的值。
第五步:实现backend.php
backend.php文件用于接收前台的ajax请求,并返回xml格式的消息。其内容如下:
| 以下为引用的内容: <?php include("config.php"); header("Content-type: text/xml"); header("Cache-Control: no-cache"); foreach($_POST as $key => $value) if(@$action == "postmsg") echo "<?xml version=\"1.0\"?>\n"; |
前台会从backend.php得到xml相应,并解码xml文件显示在页面上。
第六步:用样式显示消息
用户每次载入页面,我们应在页面上显示旧的消息。因此,我们需要查询数据库以便得到旧的消息并显示他们:
| 以下为引用的内容: <div id="messagewindow"> <?php include("config.php"); // prepare the query string $query = "SELECT id, message, DATE_FORMAT(date, '%Y-%m-%d') ". "FROM message ". "ORDER BY id DESC "; // execute the query // if the guestbook is empty show a message while($row = mysql_fetch_array($result)) $message = htmlspecialchars($message); $message = nl2br($message); echo "<li><p class='info'>Added on $date :</p>"; |
这些代码也位于在index.php中,同样,我们应用CSS定义一个漂亮的消息显示:
| 以下为引用的内容: #comments, #comments li{ margin:0; padding:0; list-style:none; } #comments li{ padding:.5em; margin:.5em 0; background:#fcfcfc; border:1px solid #e1e1e1; } #comments li .info{ padding:.2em 20px; background:#f1f1f1 url(images/ico_comments.gif) no-repeat 2px 50%; margin:0; color:#333; font-family:Georgia, "Times New Roman", Times, serif; } #comments li .body{ padding:.5em 20px; } #commentForm { width: 550px; } #messagewindow { |
现在,在我们添加一个新的更新后,页面看起来如下:

第七步:为输入框创建字符计算
在twitter中有个有趣的功能,只允许用户输入最多140个字符,当用户输入时,twitter会告诉用户,他/她还能输入多少字符。如下所示:
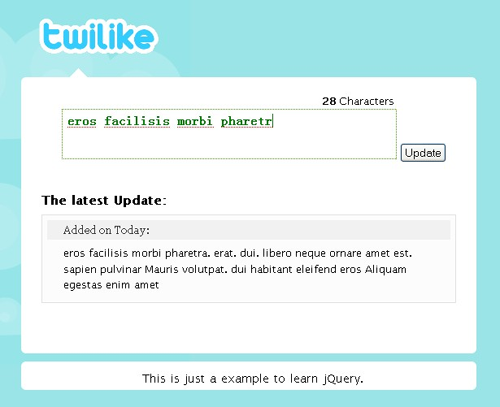
在我们的教程中,我们没必要限制用户输入为140个字符,当我们也可以计算用户输入了多少字符,并且能在用户输入时即时显示字符计数。
该功能实现代码如下:
$(document).ready(function(){
$("#counter").html($("#message").val().length + "");
$("#message").keyup(function(){
// get new length of characters
$("#counter").html($(this).val().length);
});
});
现在,当用户输入时,字符计数会同时增加,如下所示:
结论
现在,我们完成了教程。最终作品看起来如下图:

在本教程中,代码仅仅用于演示jquery, php和mysql的用法,因此,有时候看来不那么优雅。
相关新闻
更多相关新闻>>- 用Windows Server 2003/2000/XP自带的IIS建网站
- 2009/10/19
- 网站优化如何兼顾百度与谷歌
- 2009/7/1
- 如何推广自己的淘宝宝贝
- 2009/8/2
- 伪静态设置(win2003)
- 2009/9/2
- 老刘:网站推广方案如何写到精准
- 2009/8/23
- Web页中页脚(Footer)贴底实现(兼容IE6/7/8, FF3)
- 2009/8/16
- 没有主机空间如何备案域名
- 2009/4/25
- 国内几个比较牛的网站UED博客 体验与分析
- 2009/4/19
- 备案,总是出现信息有误如何解决?
- 2009/3/17
- 首页site不在第一页 是一个信号而不是降权
- 2009/8/14